CHROME Metal Font
Step 1
Create the text you like using Type tool and black color.

Step 2
Add layer style::
Drop Shadow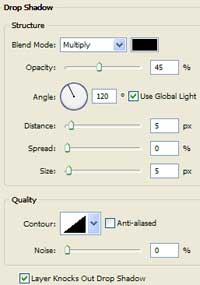

Inner Shadow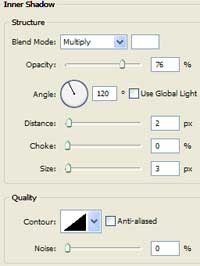
Bevel and Emboss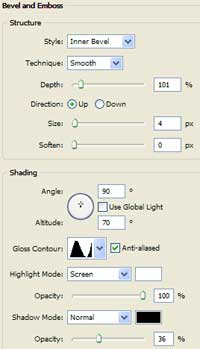
Satin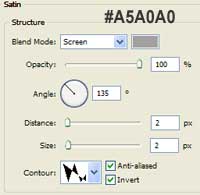
Stroke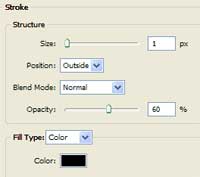
Color Overlay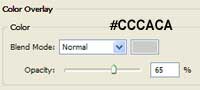
Gradient Overlay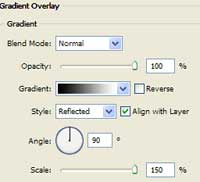
Step 3
Go under Layer -> New Adjustment Layer -> Curves
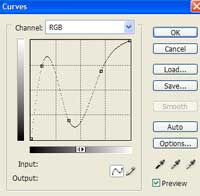
Make the settings as the above picture.
The finished result:

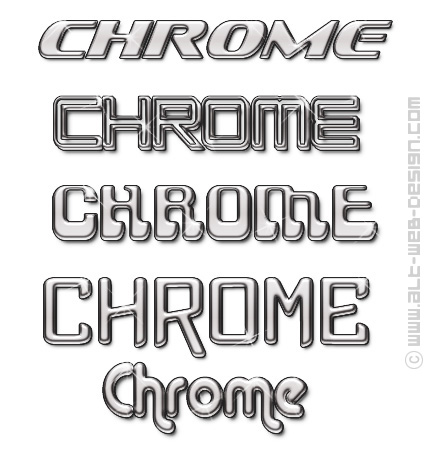
Applied texture:
Hi there ~ THANK YOU. And I really like the first font under “Applied texture:” Can you tell me what that is?
Best, KL
@KLM
Sure, the font is “Sofachrome”.
nice tuto, where can i download the contours that you used for the glow effect? Thats not standard these flie
thx for link
@mike
What do you mean by “glow effect”? I didn’t use any Inner Glow or Outer Glow. I just added some sparkles with sparkles brushes. You can download them from this place: http://www.obsidiandawn.com/glitter-photoshop-gimp-brushes
thanks admin, i mean the contours that u used on this picture > https://alt-web-design.com/text-tutorials/images/chrome02d.jpg
Looks like a flie or something like that ^^ I´ve searched google for a while to find new contours but didn´t find any contour that looks similar to yours 😀
thx
It is a custom made contour. You can download it here.
awesome tut. I’m new to Photoshop. What is the best way to merge the adjustment layer with the base layer? I’m trying to add the chrome font I created to a business card I’m working on and it seems to invert the rest of the images when I do this?
@tom
I’m affraid that merging the adjustment layer with just the base layer won’t work. You need to merge everything together with the background layer. It is the easyest to do by going to Layer -> Merge Visible (or Shift+Ctrl+E) or Layer -> Flatten Image.
thank you very much for the contours!!
awesome tut 😉
Nice tutorial indeed. I’m also new to Photoshop so please let me know how to install the plug-ins/filters you link to.
@Esben Slot Sørensen
Photoshop must be closed when installing new plugins.
Download your plugin/filter and unzip it. Then copy and paste it to a corresponding folder.
Find folder on your PC where Photoshop is installed, probably something like: C:\Program Files\Adobe\Adobe Photoshop.
There you will find a folder to install plugins: C:\Program Files\Adobe\Adobe Photoshop \Plug-Ins.
Presets should be installed in the folder: C:\Program Files\Adobe\Adobe Photoshop \Presets, each in its own subfolder.
The contour I offered for download in this tutorial should be installed here: C:\Program Files\Adobe\Adobe Photoshop \Presets\Contours.
cool thanx. Now, I’ll lean back and wait for a tutorial in glassy fonts 🙂
Hi. I was just wondering what font you used for “the final result”?
I used to have it and lost it and cannot for the life of me remember the name.
@Jay
The font is “Magneto”.
Great tutorial. Where can I find the contour you used? it does not appear to be standard in photoshop cs4.
hello i am using adobe photo shop cs4 and i tried making letters chrome but it did not work , in the satin box ” contour” the shape was not in the box ? any suggestions?
Thank you Angelo
hi im jst wondering if i copy it onto paint will the back ground be black because ive had that problem with a lot of different chrome fonts
I had the same problem as angelo. the shape was there.
I loaded the contour, but it looks nothing like the tutorial. Mine looks nothing like the end result. I’m stumped!
Whats the contour that looks like a couple of butterflys?
@German Jake
As I have already said before, it is a custom made contour. You can download it here .
I downloaded the contours from your link and can’t seem to find the image shown in the “satin” step, am I just missing it or what is the name in the list?
if it’s custom how can I create it?
also I can’t seem to get the sharp clear image like you have as a final result.
I’m new to photoshop and I’m learning as I go all help is greatly appreciated
Thank, Nu
Hi, love the fonts in the final edition. Can you tell me what the 2nd and 4th fonts are?
@Crystal
The fonts are, from top to bottom:
Sofachrome
SF Chromium 24
Gravity Sucks
Xtreme Chrome
Alba Matter
yeahhh super tut even 2 years later :DDD Nevertheless can you tell me what´s the name of the font in “The finished result” ???
Thanks Gob
@goblin
The font is “Magneto”.
I followed your link and loaded the contour (chrome-alt.shc) for Satin Layer Style, but it doesn’t look like the “double-butterfly” one shown on your screen, and so I cannot get the same effect… please help!!!
CAn this be accomplished with pse5? I know it is VERY dated but htis is what I have.
Thanks!
I think I figured it out!
Amazing Tutorial… and you’ve patience with all the font questions…
I do not have photo shop and you may not answer as the last entry was 2011. I need the name Zander or ZANDER in chrome and in Magneto font. Can you help? Jane
Jpg or SVG?
Hi. I see that you don’t update your blog too often. I know that writing
articles is boring and time consuming. But did you know that there is a
tool that allows you to create new articles using existing content (from article directories or other pages from your niche)?
And it does it very well. The new articles are high quality and pass the copyscape test.
You should try miftolo’s tools